GOMO SIM Registration: Ultimate Guide
Activate your GoMo SIM or eSIM with ease using the GoMo App and enjoy fast, secure, and reliable 4G and 5G data. Stay seamlessly connected with quick activation and enhanced digital convenience.
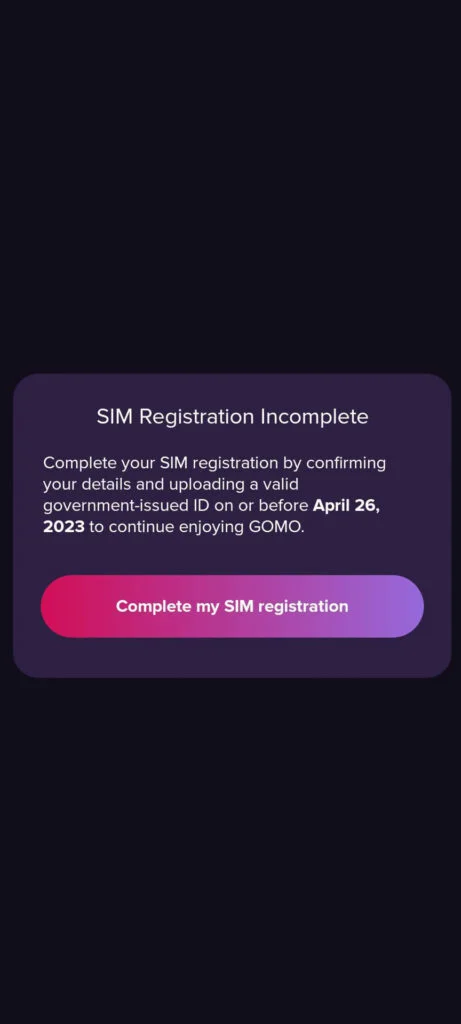
As mandated by the GoMo SIM Registration Act, it is essential to register all SIM cards, whether physical or eSIM, prior to activation. This rule applies to all mobile users, including those using prepaid broadband services. To stay compliant, make sure to complete your SIM registration online by following the link below.

GOMO SIM Online Registration Link
Begin your GoMo SIM registration by first downloading the official GoMo app. Before you proceed, it’s recommended to review the GoMo SIM registration FAQs to ensure a smooth and hassle-free process.

Note: The process of Gomo registration and register globe sim is same not different.
GoMo Registration via App
Step 1: Open GoMo App:
To get started with your GoMo SIM or eSIM activation, you’ll need the official GoMo mobile app. Follow these simple steps:
-
Check Device Compatibility
Make sure your smartphone supports the GoMo app and eSIM functionality (if applicable). -
Download the GoMo App
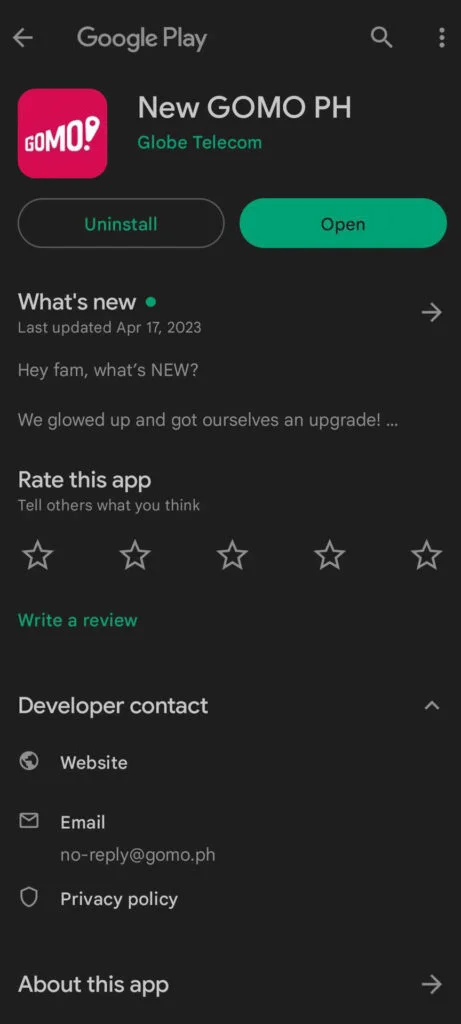
Head to your device’s app store, the Google Play Store for Android users or the Apple App Store for iOS users, and search for “GoMo.”
If you haven’t already installed it, download and launch the app on your phone.
With the app ready to go, you’re one step closer to fast, secure, and seamless connectivity.
Step 2: Download the GoMo App
-
Open Your App Store
Launch the app store on your smartphone, either the Apple App Store for iOS or Google Play Store for Android. -
Search for the Official App
Type in “GoMo” or “GoMo PH” in the search bar. -
Download and Install
Locate the official GoMo mobile app and tap Download or Install to add it to your device.
Step 3: Sign Up Your Account
- Open the GoMo app.
- If you don’t already have an account, sign up for a new one.
- Enter the necessary details, such as your full name, email address, mobile number, and password.
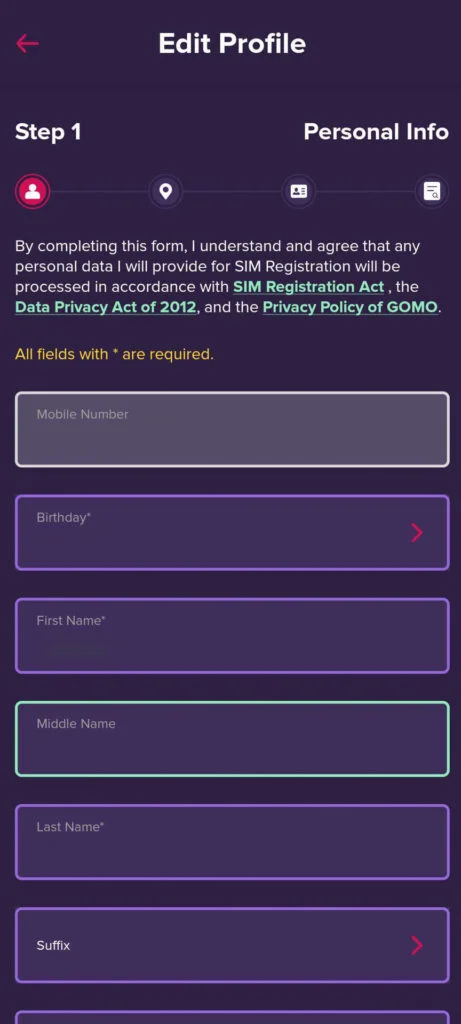
Step 4: SIM Registration
- After setting up your account, go to the SIM registration section within the GoMo app.
- Follow the on-screen prompts to begin the SIM registration process.

Step 5: Verify Your Information
- Enter the required personal details as requested by the app.
- Make sure all information matches the details on your valid ID to avoid any issues during verification.

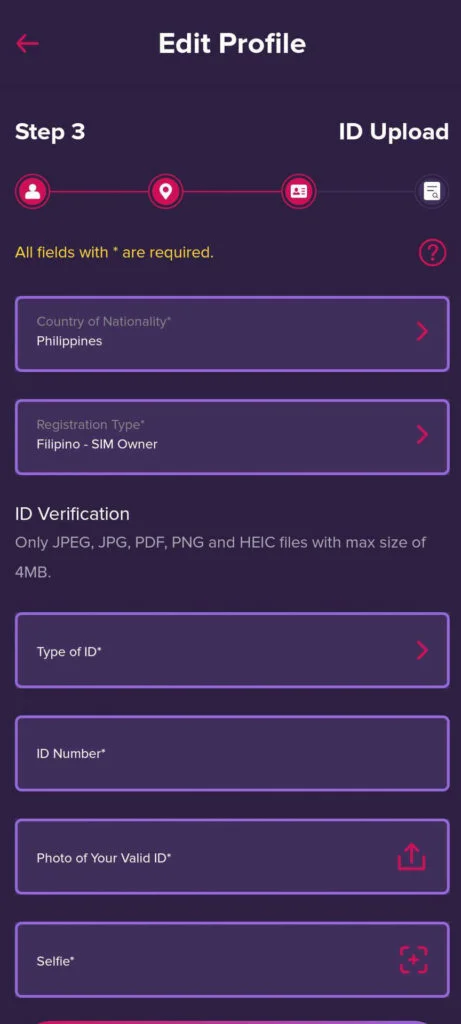
Step 6: Upload Your IDs
- You’ll likely need to upload valid identification documents for verification, such as a government-issued ID, passport, or other accepted forms of ID.
- Capture clear, readable photos of your documents and upload them via the app.
- Before submitting, double-check that all uploaded details are accurate and complete.
Step 7: Receive Verification Code
- Once you’ve submitted your registration details and ID documents, GoMo will review your application.
- If approved, you’ll receive a confirmation message or a verification code via SMS or email.
- Enter the verification code in the app to finalize your SIM registration.
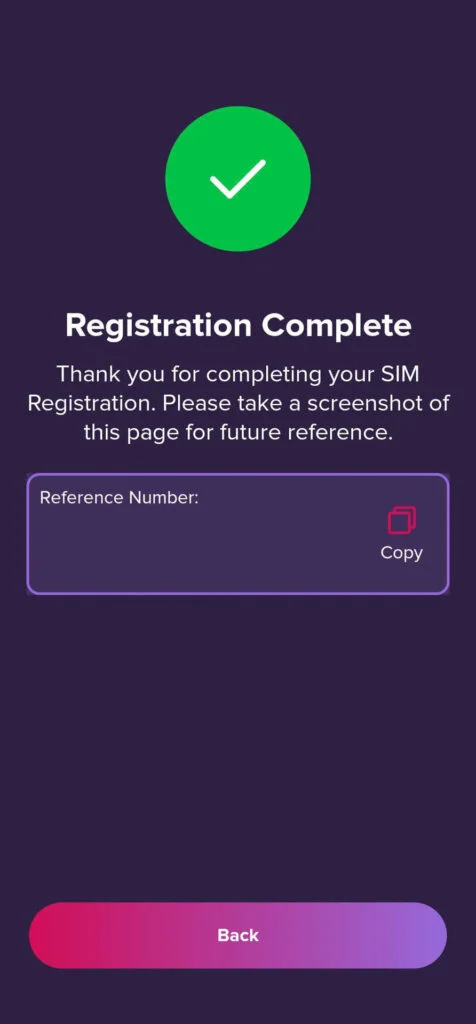
After completing the steps and receiving confirmation from GoMo, your SIM card will be activated and ready to use with their mobile services. Please note that the exact process may vary depending on your location and the version of the GoMo app, so it’s important to follow the official instructions provided by GoMo for the most accurate and up-to-date guidance.
Sometimes people use multiple SIM cards from different networks, so if you have a Smart SIM, a TNT SIM, and a TM SIM card, then the process of registration is almost the same.
Information Required for GoMo SIM Registration:
How to Register Sim?
To complete your GoMo SIM registration smoothly, make sure you have the following details and documents ready. These are required to verify your identity and comply with registration regulations:
-
Full legal name
-
Date of birth
-
Gender
-
Current residential address
-
A valid government-issued photo ID
-
A signed declaration confirming the authenticity of the submitted ID
Having this information prepared will help ensure a fast and secure registration process for your GoMo SIM card.
Accepted Ids
To complete your GoMo eSIM registration successfully, you’ll need to provide a valid, government-issued photo ID. Below is a list of accepted identification documents:
-
Passport
-
National ID
-
(SSS) ID
-
(GSIS) e-Card
-
Driver’s License
-
(NBI) Clearance
-
Police Clearance
-
(LTOPF) ID
-
(PRC) ID
-
(IBP) ID
-
(OWWA) ID
-
(BIR) ID
-
Voter’s ID
-
Senior Citizen ID
-
(UMID)
-
(PWD) ID
-
Any other government-issued ID with a photo
Be sure to have your chosen ID and required personal details ready before starting your GoMo eSIM registration to ensure a quick and hassle-free experience.
What if I fail to register my GOMO Sim?
If your GoMo SIM card registration is unsuccessful, it’s important to act quickly. Unregistered SIMs may face usage restrictions or even deactivation, depending on local regulations and GoMo’s policies. Here’s how you can troubleshoot and resolve the issue:
- Review Error Messages
- Contact GoMo Support
- Double-Check Your Information
- Resubmit Corrected Information
- Follow Support Instructions
- Visit a GoMo Store (If Available)
- Stay Compliant with Local Rules
- Keep a Record of Communication
Registering Multiple GoMo SIMs? Here’s What to Know
GoMo allows subscribers to own and use more than one SIM card. However, each SIM must be registered under the subscriber’s own name and personal information.
Here’s what this means in detail:
Multiple SIM Usage
- It’s perfectly acceptable to use multiple GoMo SIM cards, for example, one for personal use, another for business, or separate SIMs for different devices like smartphones, tablets, or mobile hotspots.
Registration Obligation
- To meet legal and regulatory requirements, each SIM card must be registered individually. This includes submitting accurate personal details such as your full name, address, and a valid ID for each SIM you activate.
Personal Responsibility
- Registering each SIM in your name ensures that you’re accountable for its use. This helps prevent misuse, enhances security, and supports transparency in telecom services.
Compliance with the Law
- Many regions enforce strict SIM registration laws to combat fraud and enhance public safety. GoMo’s policy aligns with these regulations by requiring every SIM to be officially registered to its rightful user.
While you’re free to use multiple GoMo SIMs, each one must be registered using your own verified personal information. This helps protect your identity, maintain service security, and ensures full compliance with local laws.
How to Register a GoMo SIM for a Minor
If a GoMo SIM card is intended for use by a minor (someone under the legal age), it must be registered under the name of their parent or legal guardian.
Here’s a breakdown of what this means:
SIM Cards for Minors
- Children and teenagers often need SIM cards for staying in touch with family, accessing educational resources, or ensuring their safety. However, due to legal age restrictions, they cannot register SIM cards in their own name.
Who Registers the SIM?
- Since minors typically cannot provide legal consent, the responsibility of registering a SIM card falls to a parent or legal guardian. This ensures that the SIM is linked to a responsible adult who can oversee its use.
Meeting Legal Requirements
- Telecommunication laws in many countries require that each SIM be registered with valid personal details, such as a full name, address, and identification. Registering a minor’s SIM under a parent or guardian ensures full compliance with these laws.
Safety and Oversight
- By registering the SIM under their name, parents or guardians can monitor how the SIM is used, helping ensure the child’s safety and promoting responsible mobile usage.
For Foreign Tourists
1. Valid Passport
- Submit a clear copy of your passport, including the bio page and the page(s) showing your valid visa or entry stamp.
2. Proof of Local Address
You must provide documentation confirming your place of residence while in the Philippines. This can be:
-
A hotel or accommodation booking
-
Or, if staying with someone, a signed affidavit or letter from the property owner confirming your stay
3. Return Ticket
- Present a confirmed return ticket to your country of origin or onward destination, including the scheduled date and time of departure.
Activating Your GoMo SIM: LTE and 5G Made Simple
Activating your GoMo SIM is quick and easy. Just follow the steps below to get connected:
1. Insert the SIM Card
- Turn off your mobile device and carefully insert the GoMo SIM card into the SIM slot.
2. Power On Your Device
- Switch your device back on after inserting the SIM.
3. Connect to the GoMo Network
- Wait a few moments for your phone to detect the GoMo signal. Once connected, signal bars should appear on your screen.
4. Wait for the Activation SMS
- You’ll receive an SMS from GoMo containing key details about your activation and plan.
5. Follow the Activation Instructions
- Open the SMS and follow any prompts, this may include replying to the message or clicking a link to confirm your SIM registration and activation.
6. Restart if Necessary
- If prompted, restart your device again to complete the activation process.
7. Test Your Services
- Once activated, test your data connection, make a call, and send a message to ensure everything is working properly.
8. Monitor Your Usage
- Keep track of your data usage and balance through the GoMo app or by dialing the USSD code provided by GoMo, especially if you’re on a prepaid plan.
If you run into any issues during activation, reach out to GoMo customer support. They can guide you through troubleshooting and ensure your SIM is up and running.
Note: Always follow the specific activation steps provided by GoMo, as they may vary depending on your region, plan, or current promotions.
How to Verify If Your GoMo SIM Is Already Registered?
So, you’ve just received your brand-new GoMo SIM and you’re excited to enjoy seamless connectivity, fast data, and unbeatable mobile offers. But before you jump in, have you checked if your SIM is already registered?
It’s an important step. The last thing you want is to experience disruptions while making an important call or streaming your favorite show.
Don’t worry, checking your SIM registration status is simple, fast, and gives you peace of mind. In this quick guide, we’ll show you exactly how to confirm whether your GoMo SIM is properly registered and ready to use.
Check If Your GoMo SIM Is Already Registered
Wondering whether your GoMo SIM is already registered? It’s easy to find out, and you have two quick options to choose from:
Option 1: Use Your Phone’s Dialer
The fastest way to check your registration status is through a simple USSD code:
-
Unlock your phone
-
Open your dialer
-
Dial *101# and press the call button
-
Wait a few seconds for a pop-up notification, it will confirm whether your GoMo SIM is registered
Option 2: Send a Text Message
Prefer texting? You can check your SIM status via SMS too:
-
Open your phone’s messaging app
-
Start a new message
-
In the recipient field, enter 26888
-
Type REGISTER in the message body
-
Hit Send
You’ll receive a response shortly with the current registration status of your GoMo SIM.
FAQ
How to register GOMO SIM for SIM registration?
Download the GOMO app, sign in, and go to the SIM registration section.
Fill in your personal details and upload a valid ID to complete registration.
How do I register my GOMO account?
Open the GOMO app and tap “Sign Up” to create an account.
Enter your name, email, mobile number, and verify via SMS or email.
How can I register my SIM card online registration?
You can register your GOMO SIM online through the GOMO mobile app.
Simply follow the on-screen instructions and submit required information.
How will I register my SIM?
Insert your GOMO SIM, open the app, and log in or sign up.
Go to the SIM registration section and complete the required steps.
How to register eSIM GOMO?
Buy an eSIM, scan the QR code in your phone settings to activate.
Then open the GOMO app and complete the SIM registration process.
Can I register 2 GOMO SIM?
Yes, you can register multiple GOMO SIMs under your name.
Each SIM must be registered separately with valid ID and info.
